|
Aopen KF45 Case w/ 250W PSU

Click to enlarge...
Almost forgot, see the top of the case? Riveted on. Probably a good thing,
seeing as it is a major part of the case structure, but it definately makes our
job harder as modders if we decide to add a top mounted blowhole to our cases.
It isn't all that hard to drill the rivets out and replace them with screws,
but it could make the installation of the bezel harder and have a negative impact
on the case's structural support as a whole.
While we are on the topic of the bezel, it can be annoying to remove, due to
its having six clips which need to be pushed in to get it off, and when being
done by one person can be next to impossible. It is also noteworthy that to
access all these clips both sides of the case have to be removed. This is a
minor niggle as most only need to remove the bezel to either add drives or to
modify the bezel or case.
The motherboard tray also offers the case a lot of support length wise and
prevents it from bending which is more than likely why it is riveted in place.
Again, one could drill the rivets out to make for a removable motherboard tray,
of course, this is at your own risk :)
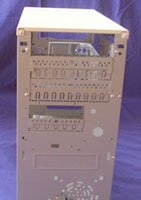
Both the top 5.25" and 3.5" drive bays have their metallic covers
removed, however the case comes with all the plastic bay covers (a lot of case
manufacturers cut corners with this, luckily Aopen didn't, as the machine going
in this case has no floppy). Each of the bays has a support fold on the
metal cover (as seen in the picture) as well as further down toward the back
of the bay chassis. This allows the drive bay to hold your drives up while you
screw them in, unlike a lot of screw based drive bays which require you to manually
hold the drive.
On the subject of drive bays, it is a pity that Aopen haven't adopted a rail-based attachment mechanism for inserting drives as seen in the Chen Ming cases
or the DTK case such as the one I have. This makes installation, as well as
removal, a complete breeze.
Working our way down we see a strange looking rectangle with extruded sides.
the purpose of this is beyond me, but I feel that it could be used as an entry
point for a bezel mounted LCD and it's cabling. (If you are daring enough to
go hacking or dremeling the bezel up)
Also notice the 80mm fan hole there. Unlike most front fan holes this one actually
has pre punched holes for screws, so you don't need to use the full length card
holder to hold your fans in place. Quite a nice addition. Again though, the
factory punched grille is inefficient and as I will discuss in the modding section
you may want to cut the grille out. The placement is also not the greatest, being
on the side it is it is mounted right behind the curve, also the front panel
has no ventilation holes so it is sucking all of its air up from the intake
at the bottom which is an excellent source of dust moreso than it is of fresh,
cool air.
Underneath the fan hole (but not pictured) is what looks like a push out metal
plate for the running of front based USB and sound ports. This caused me to
come to the conclusion that the only difference between the KF45a-c is the Bezel
that is used, as USB functionality only has to be added on the bezel and have
this push away plate removed. Of course if you take my modding advice you would
be cutting this section away anyway, but more on that later on.
Next lets take a look at the PSU.
<< Previous Page || Next Page >>
| 
